The UV Project Modifier in Blender is one of those tools that may look technical at first, but can become extremely useful once you understand how it fits into a real 3D workflow.
In this guide, you will learn how to use the UV Project Modifier to project a texture onto a 3D object, almost like using a real-world slide projector. By the end of the tutorial, you will be able to apply decals, logos, labels, graphic details, signs of wear, or localized textures without manually rebuilding the entire UV unwrap of your model.
This technique is especially useful when you need speed, flexibility, and visual control. Instead of editing UV islands manually every time, you can use an object in the scene, such as an Empty or a Camera, to control where and how the texture is projected.
[INSERT SCREENSHOT: Final 3D object with a projected decal/logo visible on the surface, showing a before-and-after comparison]
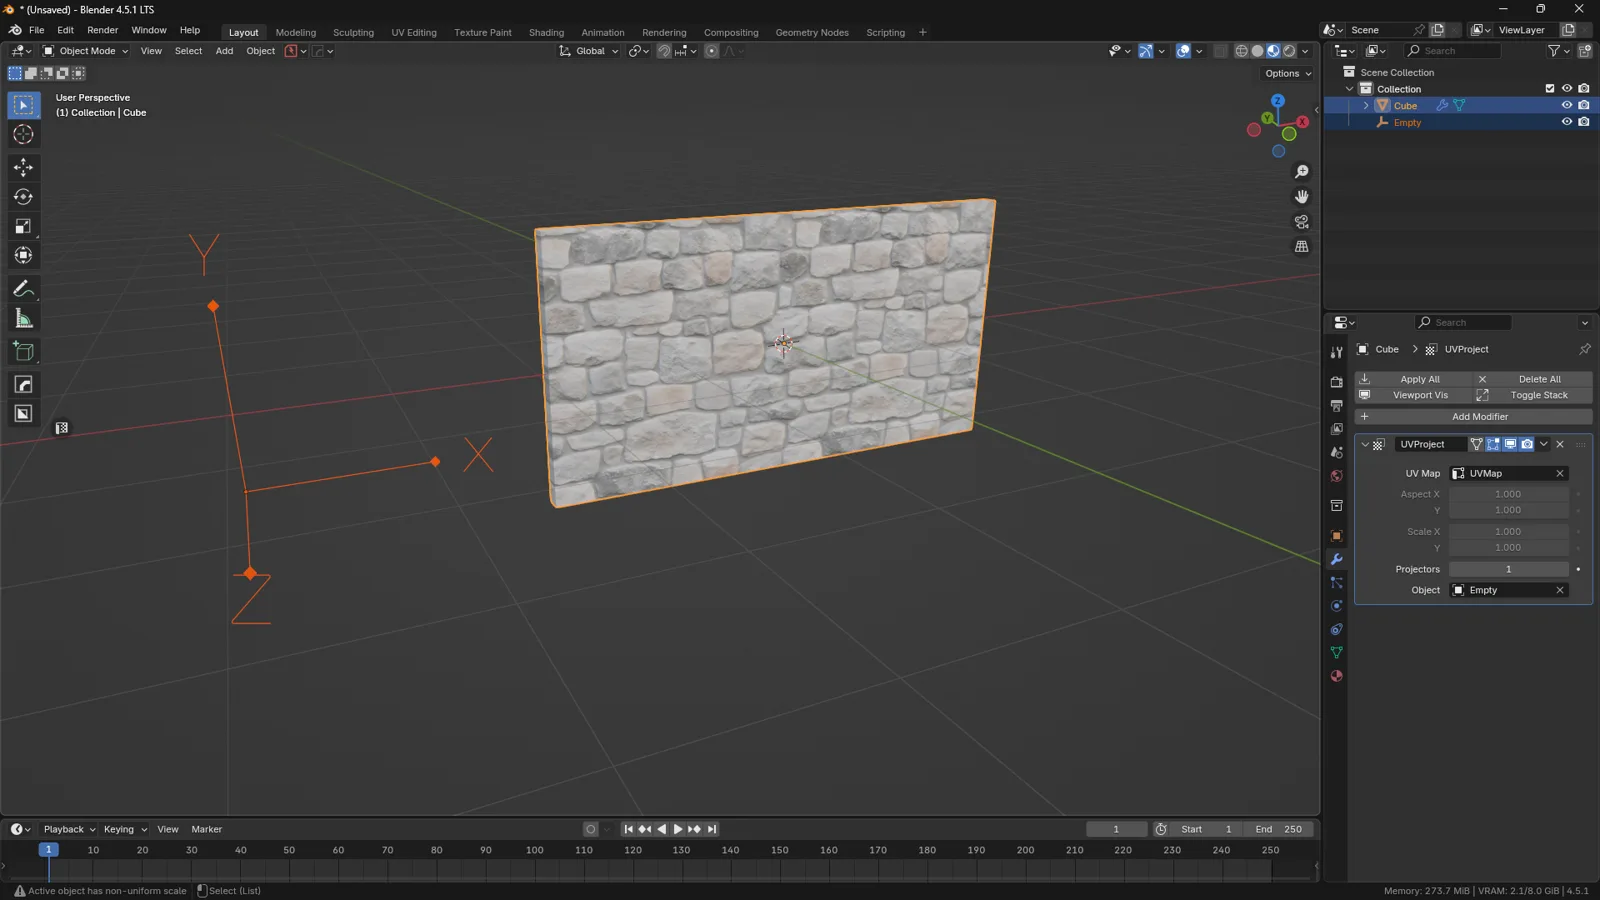
Blender UV Project Modifier setup showing an Empty object used as a projector to control texture projection direction on a 3D wall surface.
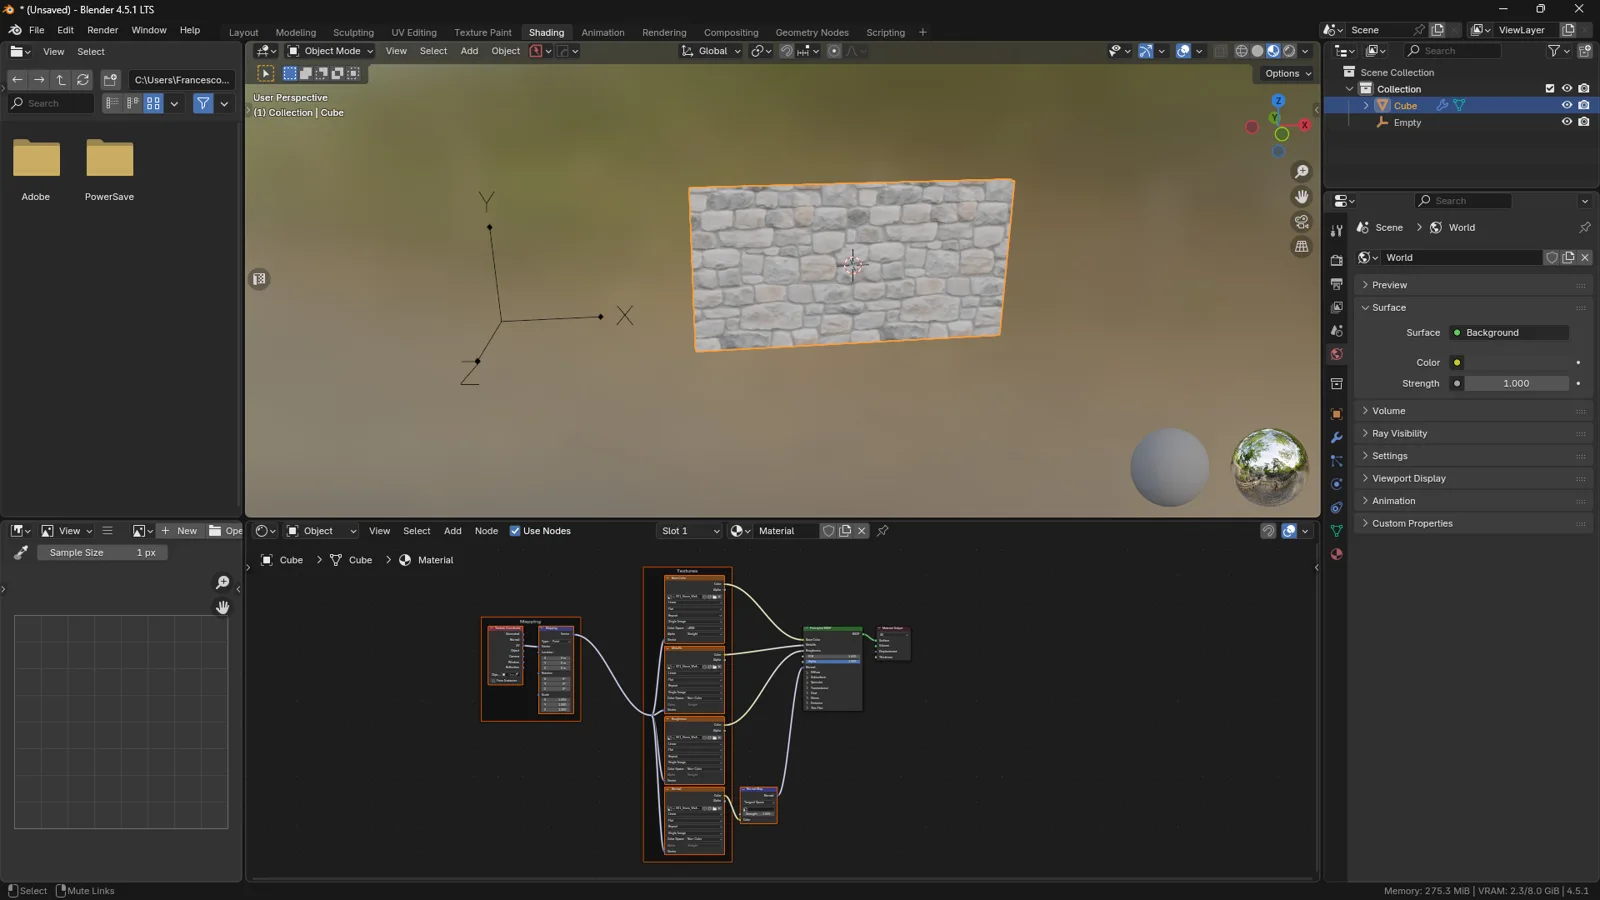
Blender UV Project Modifier material setup showing a stone wall texture connected through shader nodes for texture projection workflow.
What Is the UV Project Modifier in Blender?
The UV Project Modifier is a Blender modifier that projects UV coordinates onto an object using one or more projection objects.
In simple terms, Blender uses another object in the scene as a “projector.” This projector controls the direction, scale, rotation, and placement of the texture projection.
Instead of thinking only in terms of flat UV islands, you can think in 3D space:
- Where should the texture appear?
- From which direction should it be projected?
- How large should the projected image be?
- Should the projection be rotated or aligned to a specific surface?
This makes the UV Project Modifier very useful for tasks such as:
- applying a logo to a box, crate, or container;
- placing a label on a bottle or package;
- adding a sign or poster to a wall;
- projecting decals onto vehicles or props;
- testing graphic variations during look development;
- creating animated projection effects;
- adding localized visual details without changing the main unwrap.
Why Use UV Project Instead of Traditional UV Unwrapping?
Traditional UV unwrapping is still essential for many professional 3D assets. If you are creating a game-ready model, a marketplace asset, or a fully optimized production object, clean UVs are very important.
However, not every texture placement needs a full manual unwrap.
The UV Project Modifier is useful because it gives you a more flexible, non-destructive way to place textures on a model.
The Main Advantage: Visual Control
With traditional UV editing, you usually work inside the UV Editor. You select faces, adjust islands, scale UVs, rotate them, and try to align the texture manually.
With UV Project, you control the projection directly in the 3D viewport.
For example, imagine you want to place a logo on the front of a wooden crate.
With traditional UV editing, you would need to:
- find the correct UV island;
- scale it correctly;
- align the texture;
- check the result in the viewport;
- go back and adjust if needed.
With the UV Project Modifier, you can simply move, rotate, and scale the projector object in the scene until the logo appears exactly where you want it.
This makes the process much more intuitive, especially for decals, signs, logos, labels, and graphic details.
The Second Advantage: A Non-Destructive Workflow
Because UV Project is a modifier, you do not have to commit immediately to the result.
You can:
- enable or disable the modifier;
- change the projector object;
- adjust position, rotation, and scale;
- test different decal placements;
- duplicate the setup;
- keep the original UV unwrap untouched;
- apply the modifier later only if needed.
This is especially useful during the exploration phase of a project, when you are still testing visual ideas.
💡 3DSkillUp Pro Tip
Use Shift + A > Empty > Plain Axes to quickly create a simple projector object. Rename it immediately, for exampleUV_Projector_Logo, so your scene stays clean and easy to understand.
When Should You Use the UV Project Modifier?
The UV Project Modifier should not be seen as a full replacement for traditional UV unwrapping. It is better to think of it as a complementary tool.
Use it when you need fast, flexible texture projection.
Good use cases include:
- decals;
- logos;
- labels;
- wall graphics;
- vehicle markings;
- projected signs;
- temporary concept textures;
- localized dirt, damage, or wear;
- animated projection effects;
- fast visual tests during look development.
Use it carefully when:
- the model needs final clean UVs for export;
- the surface is very curved or organic;
- the texture must follow the geometry perfectly;
- the asset will be sold as a game-ready model;
- you need to bake everything into final texture maps;
- you need predictable results inside Unity, Unreal Engine, or another real-time engine.
For professional game-ready assets, UV Project can be very useful during production, but the final asset should usually be checked, applied, baked, or cleaned before export.
Step 1 — Prepare the Object
Start by selecting the object that will receive the projected texture.
This can be a simple cube, a wall, a crate, a barrel, a bottle, a sign, a vehicle part, or any other 3D model.
For this tutorial, imagine you are applying a logo decal to the front side of a wooden crate.
Before adding the modifier, check the object carefully.
Before You Start, Make Sure That:
- the object has a reasonable real-world scale;
- the scale has been applied;
- the material is assigned correctly;
- the mesh has enough geometry for the projection area;
- the object has at least one UV Map if you want precise control.
To apply the scale, select the object and use:
Ctrl + A > Scale
This is an important step. If your object has unapplied scale values, modifiers and texture projection can behave in unexpected ways. Applying the scale helps Blender interpret the object’s dimensions more consistently.
Step 2 — Create a Dedicated UV Map
The UV Project Modifier works on a UV Map. If your object already has UVs, you can technically use the existing UV Map. However, in many cases it is better to create a dedicated UV Map for the projection.
This keeps your workflow cleaner and gives you more control.
Why Create a Separate UV Map?
A separate UV Map allows you to keep different texture systems organized.
For example:
- one UV Map for the main material;
- one UV Map for decals;
- one UV Map for projected labels;
- one UV Map for temporary look development tests.
This is useful because your main unwrap remains untouched. If you later decide to remove or change the projected texture, the base asset is still clean.
How to Create a New UV Map
- Select the object.
- Go to Object Data Properties.
- Open the UV Maps section.
- Click the + button.
- Rename the new UV Map, for example:
UV_Project_Decal
Step 3 — Create the Projector Object
Now you need an object that will control the projection.
The most common choice is an Empty, because it is lightweight, easy to see in the viewport, and simple to transform.
How to Create the Empty
Use:
Shift + A > Empty > Plain Axes
Then place the Empty in front of the surface where you want the texture to appear.
Understanding the Projection Direction
This is one of the most important details of the UV Project Modifier.
The projector object has a direction. The texture is projected from that object toward the surface. If the Empty is facing the wrong direction, the texture may not appear where you expect.
So if your projection does not work, do not immediately assume the modifier is broken. Very often, the issue is simply the orientation of the projector.
A good workflow is:
- Place the Empty in front of the target surface.
- Rotate it so it faces the object correctly.
- Use orthographic views to align it more accurately.
- Adjust the scale to control the size of the projected texture.
💡 3DSkillUp Pro Tip
Use orthographic views to align the projector more precisely:
Numpad 1 for Front View, Numpad 3 for Right View, and Numpad 7 for Top View.
For clean decal placement, orthographic alignment is usually more reliable than working only in Perspective View.
Step 4 — Add the UV Project Modifier
Now select the object that will receive the projected texture.
Go to:
Modifier Properties > Add Modifier > Modify > UV Project
[INSERT SCREENSHOT: Blender Add Modifier menu with UV Project highlighted]
Once added, the modifier gives you several important settings.
UV Map
In the UV Map field, choose the UV Map that should receive the projection.
If you created a dedicated UV Map, select:
UV_Project_Decal
This helps you keep the projected decal separate from the main UV unwrap.
Projectors
In the Projectors section, assign the Empty you created earlier.
This tells Blender which object should control the projection.
Once the Empty is assigned, moving, rotating, or scaling it will affect how the texture is projected onto the mesh.
Aspect X and Aspect Y
The Aspect X and Aspect Y values control the proportions of the projected image.
This matters because not all images are square.
For example:
- a square logo may work well with a 1:1 ratio;
- a wide label may need a wider aspect ratio;
- a tall vertical sticker may need a different proportion;
- a rectangular sign may look stretched if the aspect values are not adjusted.
If your texture looks compressed or stretched, check these values before changing the model or the material.
Step 5 — Create the Material and Add the Texture
The UV Project Modifier controls the UV coordinates, but you still need a material that uses an image texture.
Basic Material Setup
- Select the object.
- Open the Shader Editor.
- Create or select a material.
- Add an Image Texture node.
- Load the image you want to project.
- Connect the image color output to the Base Color input of the Principled BSDF shader.
Use the Correct UV Map in the Material
If your object has multiple UV Maps, you should tell the material which UV Map to use.
To do this:
- Add a UV Map node in the Shader Editor.
- Select the UV Map used by the modifier, for example:
UV_Project_Decal - Connect the UV output of the UV Map node to the Vector input of the Image Texture node.
This ensures that the texture reads the projected UV coordinates instead of the default UV Map.
💡 3DSkillUp Pro Tip
If the texture does not seem to respond to the UV Project Modifier, check two things first:
the modifier is writing to the correct UV Map, and the material is reading from that same UV Map.
Step 7 — Fix Stretching and Distortion
The UV Project Modifier works best on flat or slightly curved surfaces.
On very curved, angled, or complex geometry, the texture may stretch. This happens because the texture is projected from one direction. If parts of the surface face away from the projector or curve too sharply, the projection becomes distorted.
How to Reduce Stretching
You can improve the result by:
- projecting onto flatter surfaces;
- aligning the projector more carefully;
- reducing the size of the projection area;
- using a separate decal mesh;
- using multiple projectors for different angles;
- applying the modifier and manually editing the UVs afterward;
- using traditional UV unwrapping for complex organic surfaces.
💡 3DSkillUp Pro Tip
For decals on curved surfaces, consider using a separate thin decal plane slightly above the main surface. This can give you cleaner visual control and reduce distortion, especially for logos, labels, and graphic marks.
Step 8 — Use Multiple Projectors
The UV Project Modifier can use more than one projector object.
This is useful when you need to project textures from different directions.
For example, you could use:
- one projector for the front side;
- one projector for the left side;
- one projector for the right side;
- one projector from above.
This can help when working with architectural assets, boxes, technical props, or stylized projection effects.
However, use this carefully. The more projectors you add, the more complex the setup becomes. For final game-ready assets, you should always keep exportability and clarity in mind.
Step 9 — Should You Apply the UV Project Modifier?
This depends on your final goal.
If You Are Working Only in Blender
If the asset is for a Blender render, animation, or concept scene, you can leave the modifier live and non-destructive.
This allows you to:
- keep editing the projection;
- animate the projector;
- test different images;
- create variations;
- preserve the original setup.
If You Need to Export the Asset
If the asset is going to Unity, Unreal Engine, another DCC software, or a 3D marketplace, you need to be more careful.
In that case, you may need to:
- apply the modifier;
- check the generated UVs;
- bake the projected texture;
- simplify the material;
- export clean texture maps;
- test the asset in the target software.
The UV Project Modifier is not “wrong” for game-ready workflows. It simply needs to be managed properly before final delivery.
💡 3DSkillUp Pro Tip
Before applying the modifier, duplicate the object with Shift + D or save an incremental version of the file. For example:
crate_uvproject_v01.blend
crate_uvproject_applied_v02.blend
This gives you a backup of the editable version.
Common UV Project Modifier Problems and How to Fix Them
The Texture Does Not Appear
Check the following:
- Is the material assigned to the object?
- Is the Image Texture node connected correctly?
- Is the correct UV Map selected in the modifier?
- Is the material using the same UV Map?
- Is the Empty assigned as a projector?
- Is the projector facing the object?
- Is the texture loaded correctly?
The Texture Is Rotated Incorrectly
The projector object is probably rotated in the wrong direction.
Try rotating the Empty by 90 degrees on one of the main axes and observe how the projection changes.
The Texture Looks Stretched
Check:
- Aspect X and Aspect Y;
- image proportions;
- Empty scale;
- object scale;
- surface angle;
- whether the mesh is too curved for a simple projection.
The Texture Appears on the Wrong Area
The projector may be aimed in the wrong direction, placed too far away, or scaled incorrectly.
Try moving the Empty closer to the target surface and aligning it from an orthographic view.
Practical Example: Adding a Logo to a Wooden Crate
Let’s imagine you are creating a game-ready wooden crate and you want to add a logo that says:
3DSkillUp Supplies
Instead of editing the main unwrap, you can use the UV Project Modifier to place the logo directly on the front side of the crate.
Recommended Setup
Use:
- a wooden crate model;
- a main wood material;
- a main UV Map for the base texture;
- a second UV Map named
UV_Project_Logo; - an Empty placed in front of the crate;
- a UV Project Modifier connected to the Empty;
- a decal/logo texture;
- a UV Map node in the material reading from
UV_Project_Logo.
Why This Workflow Is Useful
This method lets you add visual storytelling without destroying the base material setup.
You can quickly test:
- different brand marks;
- warning labels;
- serial numbers;
- painted signs;
- warehouse markings;
- military decals;
- worn industrial graphics;
- product variations.
If you create 3D assets for marketplaces, this can be very useful. A simple decal variation can make an asset feel more specific, more detailed, and more valuable.
UV Project Modifier for Game-Ready Assets
For game-ready assets, the UV Project Modifier can be a strong production tool, but it should not be left unmanaged.
A buyer or technical artist usually expects clean files, clear materials, and predictable texture behavior.
Recommended Game-Ready Workflow
- Use UV Project to place decals quickly.
- Approve the visual result.
- Apply the modifier if needed.
- Inspect the generated UVs.
- Bake the projected decal into a final texture map.
- Clean up unused materials and objects.
- Export the asset.
- Test it inside the target engine.
This is especially important if you sell assets on platforms such as Superhive, ArtStation, CGTrader, Unity Asset Store, or Unreal Engine Marketplace.
A good asset is not only visually appealing. It also needs to be organized, predictable, and easy to integrate into another artist’s project.
UV Project vs Project From View
Blender also includes UV tools such as Project From View, which can be useful for creating UVs based on the current viewport.
Both techniques can be useful, but they serve different purposes.
Project From View
Use Project From View when you want a fast, direct, and more final UV projection based on the current view.
It is simple and effective, but once the UVs are created, you edit them like normal UVs.
UV Project Modifier
Use the UV Project Modifier when you want a flexible, non-destructive projection controlled by an object in the scene.
This is better when you want to:
- keep adjusting the projection;
- animate the projector;
- test different layouts;
- avoid changing the main unwrap too early;
- use the modifier stack as part of the workflow.
In short:
- use Project From View for a quick static projection;
- use UV Project Modifier for a flexible, editable projection setup.
Best Practices for a Clean UV Project Workflow
To get better results with the UV Project Modifier, keep your scene organized.
Recommended habits:
- rename projector objects clearly;
- use dedicated UV Maps;
- apply object scale before projection;
- use orthographic views for alignment;
- keep backup versions before applying modifiers;
- check texture aspect ratio early;
- avoid using projection as a shortcut for every UV problem;
- bake final decals when exporting game-ready assets;
- delete unused projectors before final delivery if they are no longer needed.
Final Thoughts
The UV Project Modifier in Blender is a powerful tool for projecting textures, decals, labels, logos, and graphic details onto 3D models.
It is not always the final solution for every asset, but it is extremely useful when you need speed, flexibility, and direct visual control.
The most important idea to remember is this: the UV Project Modifier works like a projector. If you control the projector object well, you control the texture placement well.
For professional workflows, especially when creating game-ready assets, use UV Project as a smart production tool. Test the projection, refine the placement, then decide whether to keep it live, apply it, or bake it into a final texture.
Used correctly, it can save time, improve flexibility, and help you create more detailed 3D assets without rebuilding your UVs from scratch.