
Look at the flare at the foot of the wooden handle below. Take that flare out of the mesh and the handle gets thinner against the background. Take out the shallow dent just above it, though, and the outline barely changes. You can keep the dent by changing how light catches the wood. That is the part worth baking.
JBake 5, a Blender add-on by Jayanam, keeps the source, target, texture outputs and material setup in one panel. We’ll use the handle in the developer’s screenshots to work through a practical question: how do you tell whether the detail that left the sculpt actually made it onto the game mesh?
Give the bake the right two meshes#
In JBake, Source is the mesh that has the detail. Target is the mesh that will wear it. Here the source is named handle and the target is retopo mesh. Overlay the two in Blender before baking. Check the narrow tip and the flared base from the side: if the target cuts across an important curve, fix that curve in the mesh now. The high-to-low vise walkthrough shows the same decision on a part with machined edges.
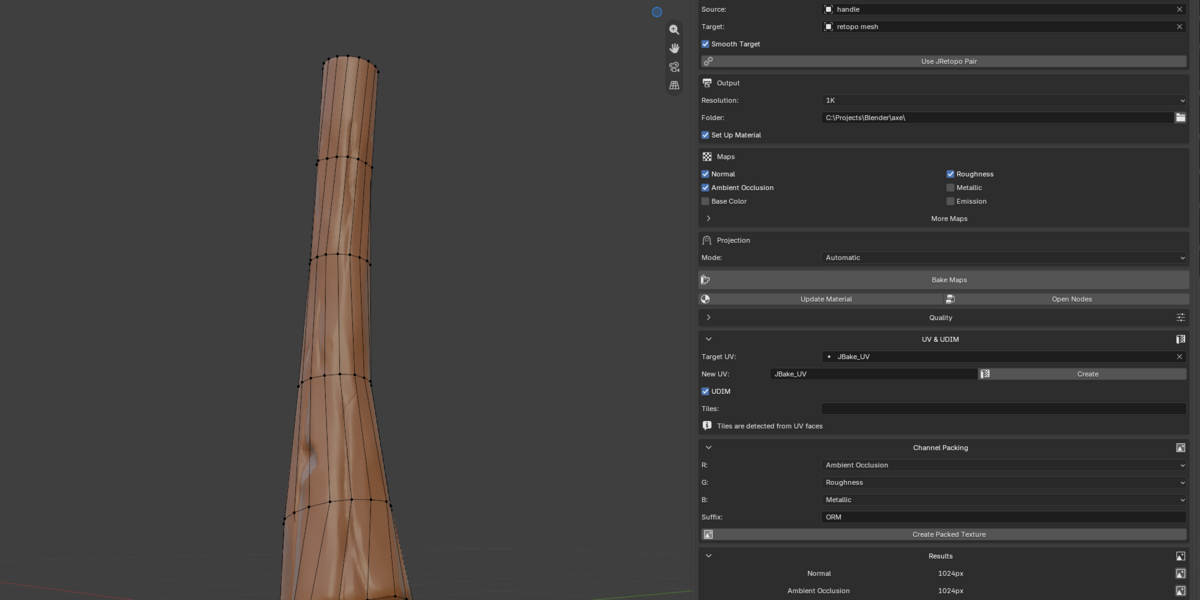
If you’ve already paired the meshes in JRetopo, Use JRetopo Pair reuses that pairing. Otherwise, set the two fields yourself. Give this pass its own output folder so that comparing it with the next bake won’t depend on your memory.
Choose the UV map that the finished material will use. JBake lets you select one or create a new UV map; give the target a usable unwrap before you bake. Put a checker across the handle. If the squares suddenly grow over the dent, that patch gets fewer texture pixels than the wood around it. Fixing its UV scale is cheaper than doubling every map. One tile is a sensible start for this prop. Use UDIMs when the asset needs multiple tiles and its destination material can read them.
Read the first normal bake on the handle#
Start with a 1K normal map and the automatic projection setting shown above. Select Bake Maps, hide the high-poly source, and look at the target under a broad light. Orbit until a highlight crosses the dent. Switch the normal map off and on without moving the view. The outline should stay put; the highlight should bend as it travels across the indentation.
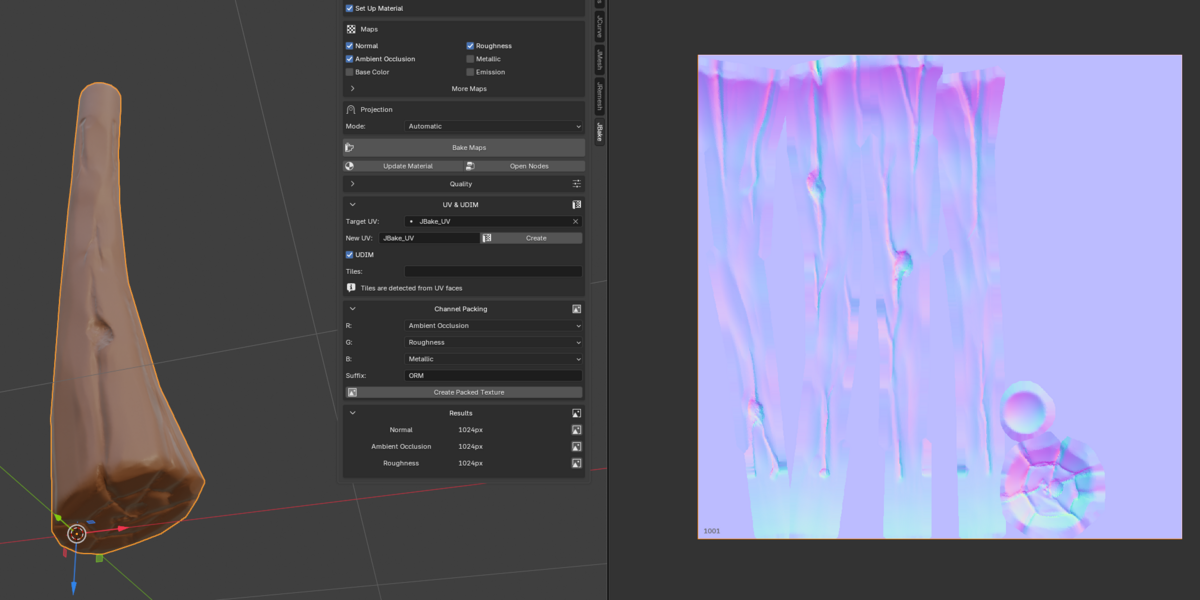
If a streak appears near the base, locate it in the baked image first. A mark that crosses an island where the sculpt is smooth points you toward the projection: check alignment and whether the rays are picking up an adjacent surface. A clean map that looks wrong only in the destination engine calls for a different check: compare its normal-map import settings and tangent convention with Blender’s. Increasing the resolution would make either mistake more expensive to repeat.
Choose the PBR maps this material can use#
The same crease tells two different stories in the maps below. In the normal map it changes the local surface direction. In ambient occlusion (AO) it can darken where the surface is sheltered. The exposed shaft is mostly pale in the AO image. That is plausible for a handle with few deep recesses; don’t increase contrast just to make the grayscale map look busier.
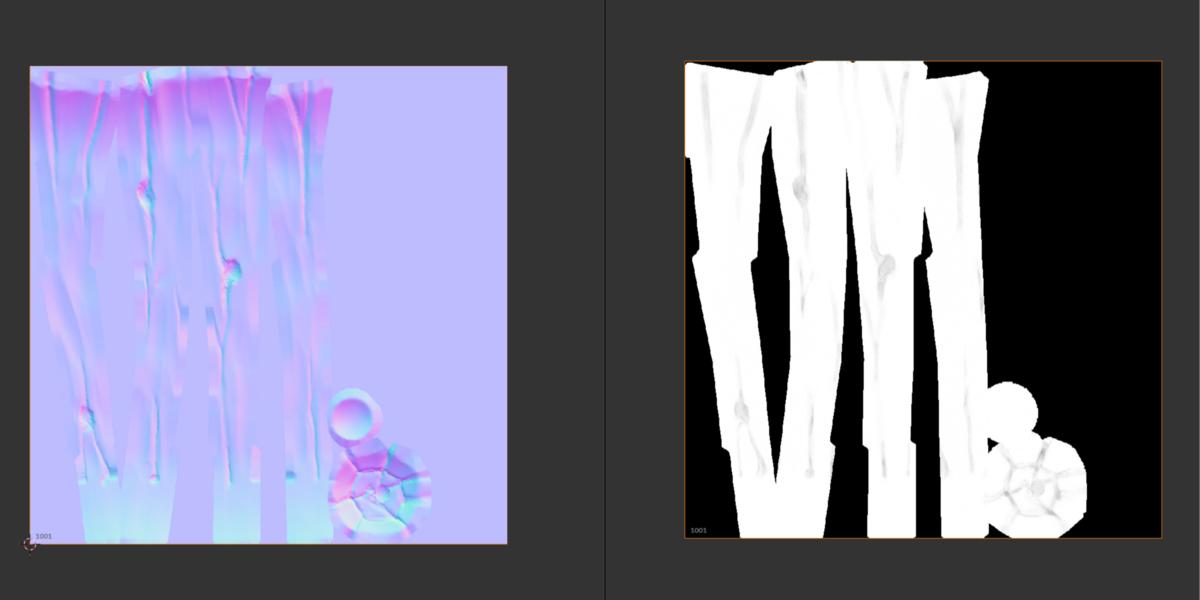
Roughness answers a third question: how wide and soft is the reflection? Imagine the grip polished by a palm while the end remains unfinished. Those surfaces could share a base colour and still reflect light differently. If your source material has that variation, bake roughness. If it has one value everywhere, a shader value may do the job without another image.
JBake also offers Base Color, Metallic and Emission. Transfer base colour when there’s paint or grain in the source material that you want to keep. Bare wood can use metallic zero; it doesn’t need a dedicated metallic image. Leave emission off unless part of the prop is meant to emit light. When the only missing detail is fine grain, compare texture sizes at gameplay distance before committing to a larger set.
Inspect the material before packing channels#
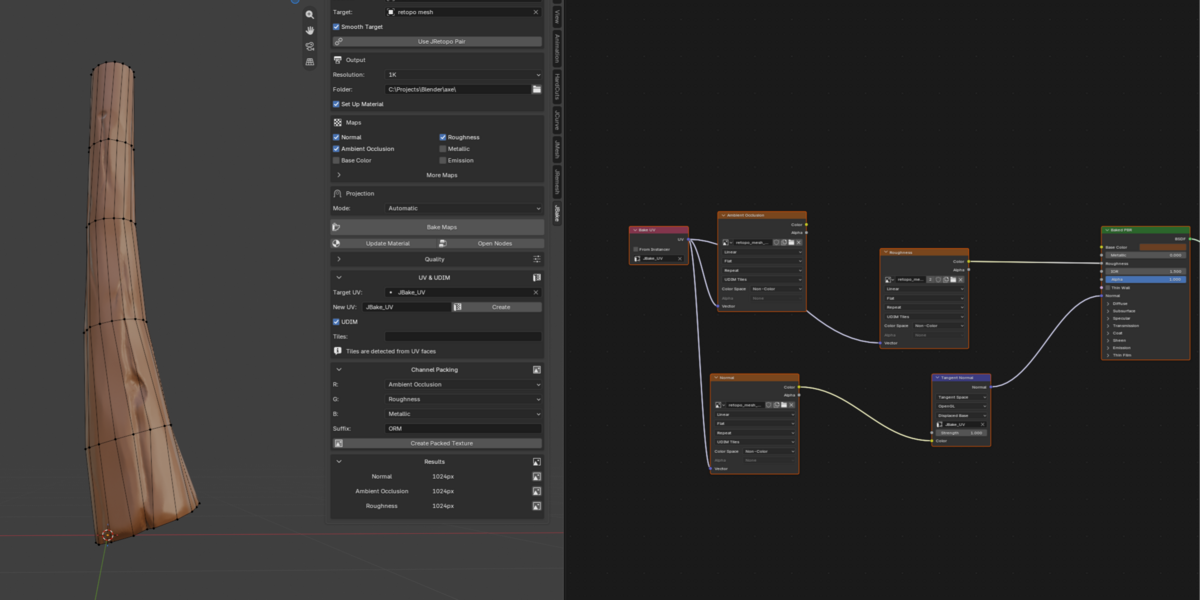
Enable Set Up Material if you want JBake to assemble the baked material. Then use Open Nodes and trace two paths. The normal image should be read as Non-Color data and pass through a tangent-space Normal Map node into the shader’s Normal input. The roughness image is also data, but its value goes to Roughness. Sending a purple normal texture straight into Base Color would paint the handle purple while leaving its shading detail unchanged.
The screenshot shows an ORM recipe: red for occlusion, green for roughness and blue for metallic. Notice the catch: Metallic was not ticked in the bake. A channel assignment isn’t evidence that a metallic map exists. For this all-wood handle, make sure blue is black (zero) if your destination expects an ORM texture. Check the individual channels after packing; green should show the roughness pattern and blue should not be a copy of it. The site’s PBR Channel Packer is another way to assemble a texture when the destination needs a different layout.
Finally, import the low-poly mesh and material into the destination scene without the sculpt. Check the dent under moving light and the outline from the player’s closest camera position. If both hold up, you’ve answered the question that matters more than whether every box in the bake panel was checked.
When JBake 5 earns its place in Blender#
For one occasional normal map, Blender’s native bake is a reasonable choice. JBake becomes more useful when a UV seam moves halfway through a job and you need to repeat the normal, AO and roughness passes, find the new images and update the material. Keeping the pair, map choices and results together is the reason to consider it. The developer’s demo below shows the workflow in motion.
3DSkillUp may earn a commission if you buy through the following link.
See JBake 5 on Superhive for the current release and supported Blender versions. If you work in Blender 4.x, confirm your exact version with the creator: the description mentions 4.x, while the listing’s version field specifies 5.0–5.2.
This optional video is provided by YouTube (Google). Loading it shares your IP address, browser information and playback activity with Google and may allow cookies or similar storage. Your permission applies to this video on this page only.